
Help
How to use Sustira, register devices, and choose a pricing plan.
1. Getting Started
Sustira is a data platform for explaining work environments with numbers. It continuously collects and records environmental data such as temperature, humidity, CO2, and power consumption from IoT sensor devices, building the evidence management needs to fulfil its accountability.
Steps to start using Sustira
Create an account
Create an account with your email address. Once registered, your Pilot (21-day evaluation period) begins.
Register API credentials
Register the API token and secret key of your SwitchBot account to connect your devices to Sustira.
Retrieve and assign devices
Retrieve the devices registered on your SwitchBot account, then assign them to a Group and Room to start monitoring.
Review your data
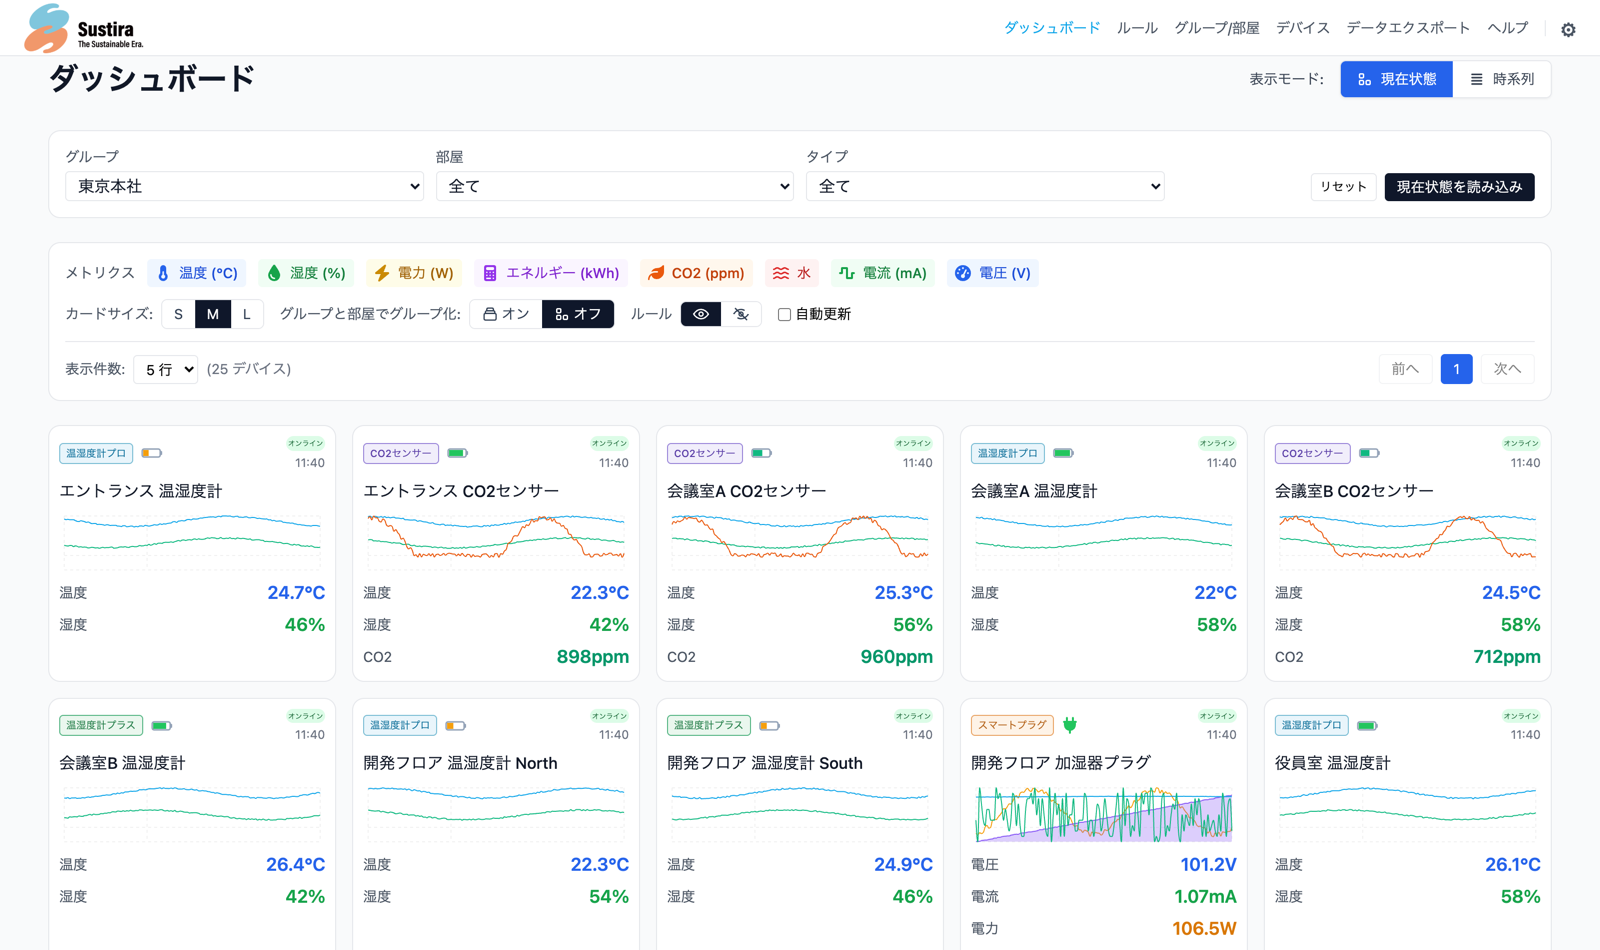
Check real-time environmental data on the dashboard. Time-series charts and period comparison help you understand trends.
2. Registering API Credentials
To let Sustira retrieve device data, you need to register the API credentials of your SwitchBot account.
What are credentials?
SwitchBot API credentials are a pair consisting of an API token and a secret key tied to a SwitchBot account. Sustira uses these credentials to periodically retrieve device data from the SwitchBot cloud API.
A credential is a boundary of responsibility for data collection. By separating SwitchBot accounts per location, per department, or per legal entity, you keep the source of each data set clearly separated.
Registration steps
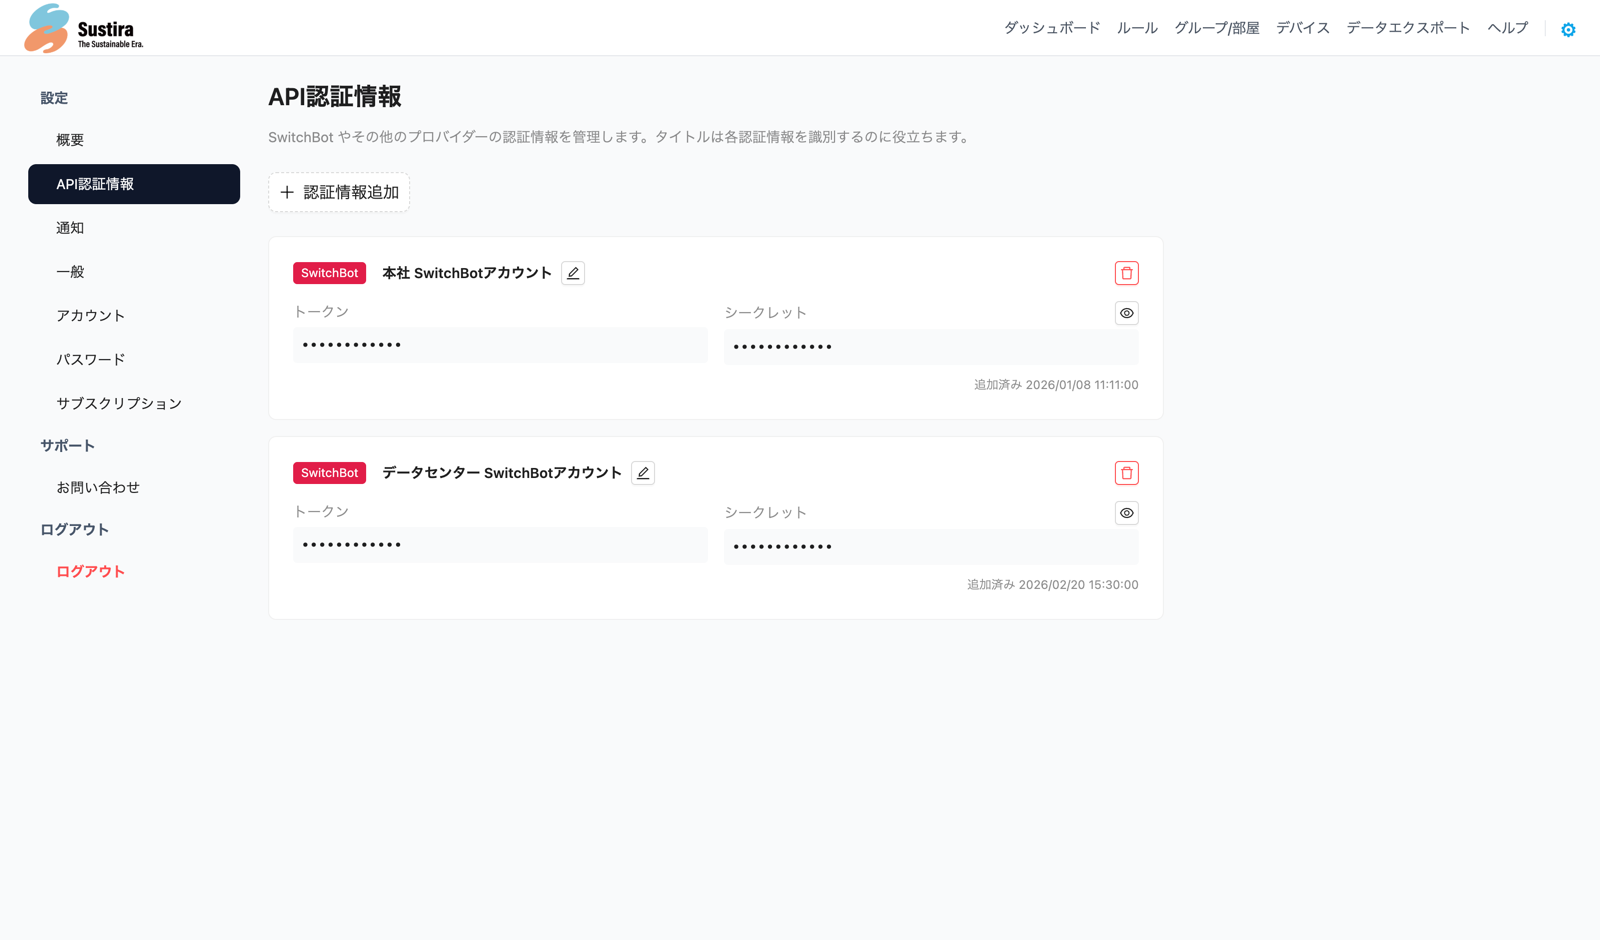
- Open "Settings" > "Credentials" in the Sustira admin screen
- Click "Add credential"
- Enter the API token and secret key obtained from the SwitchBot app
- Once the connection test succeeds, click "Save"
The number of credentials you can register depends on your plan: 1 for Base, 1 for Manage, and unlimited for Governance. If you reach the limit, you need to upgrade to a higher plan.
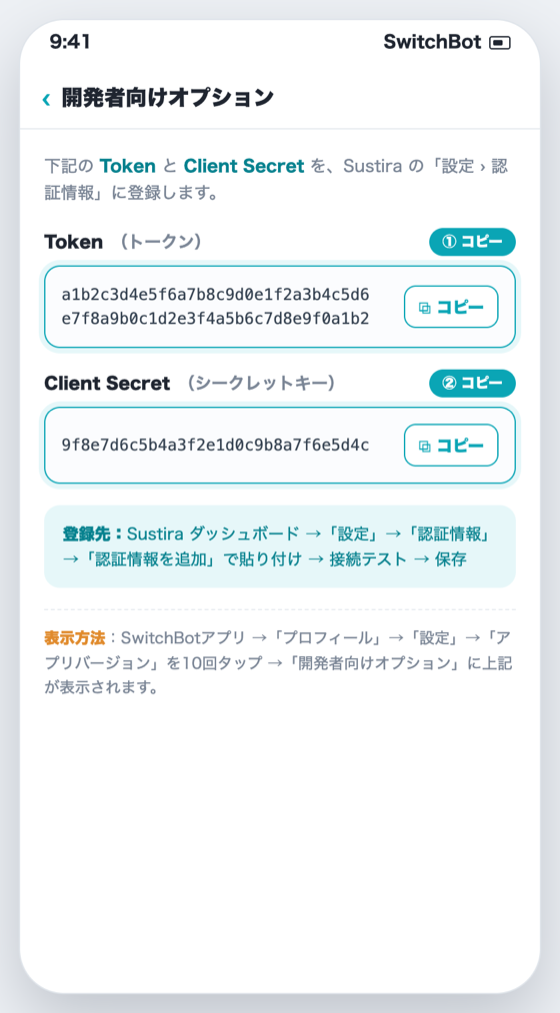
How to obtain a SwitchBot API token
- Open the SwitchBot app
- Select "Profile" > "Preferences"
- Tap "App Version" ten times to enable developer mode
- Open "Developer Options" to view your API token and secret key
3. Registering Devices
Once you register API credentials, the devices linked to your SwitchBot account appear in Sustira. Assigning those devices to a Group and Room starts environmental monitoring.
How device registration works
Step 1: Review unregistered devices
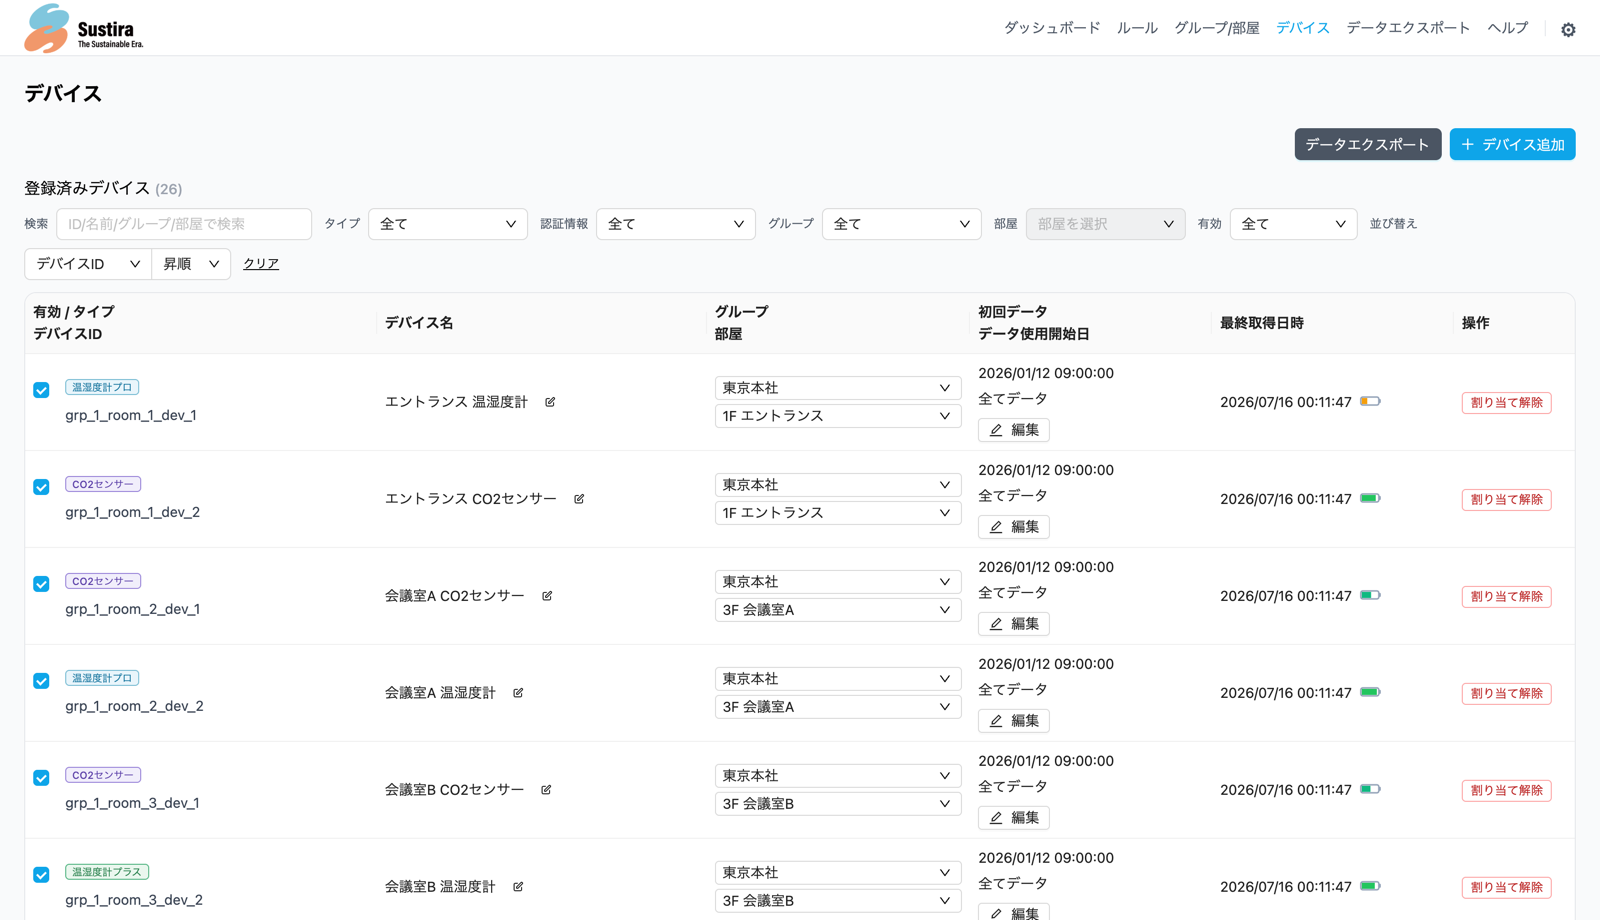
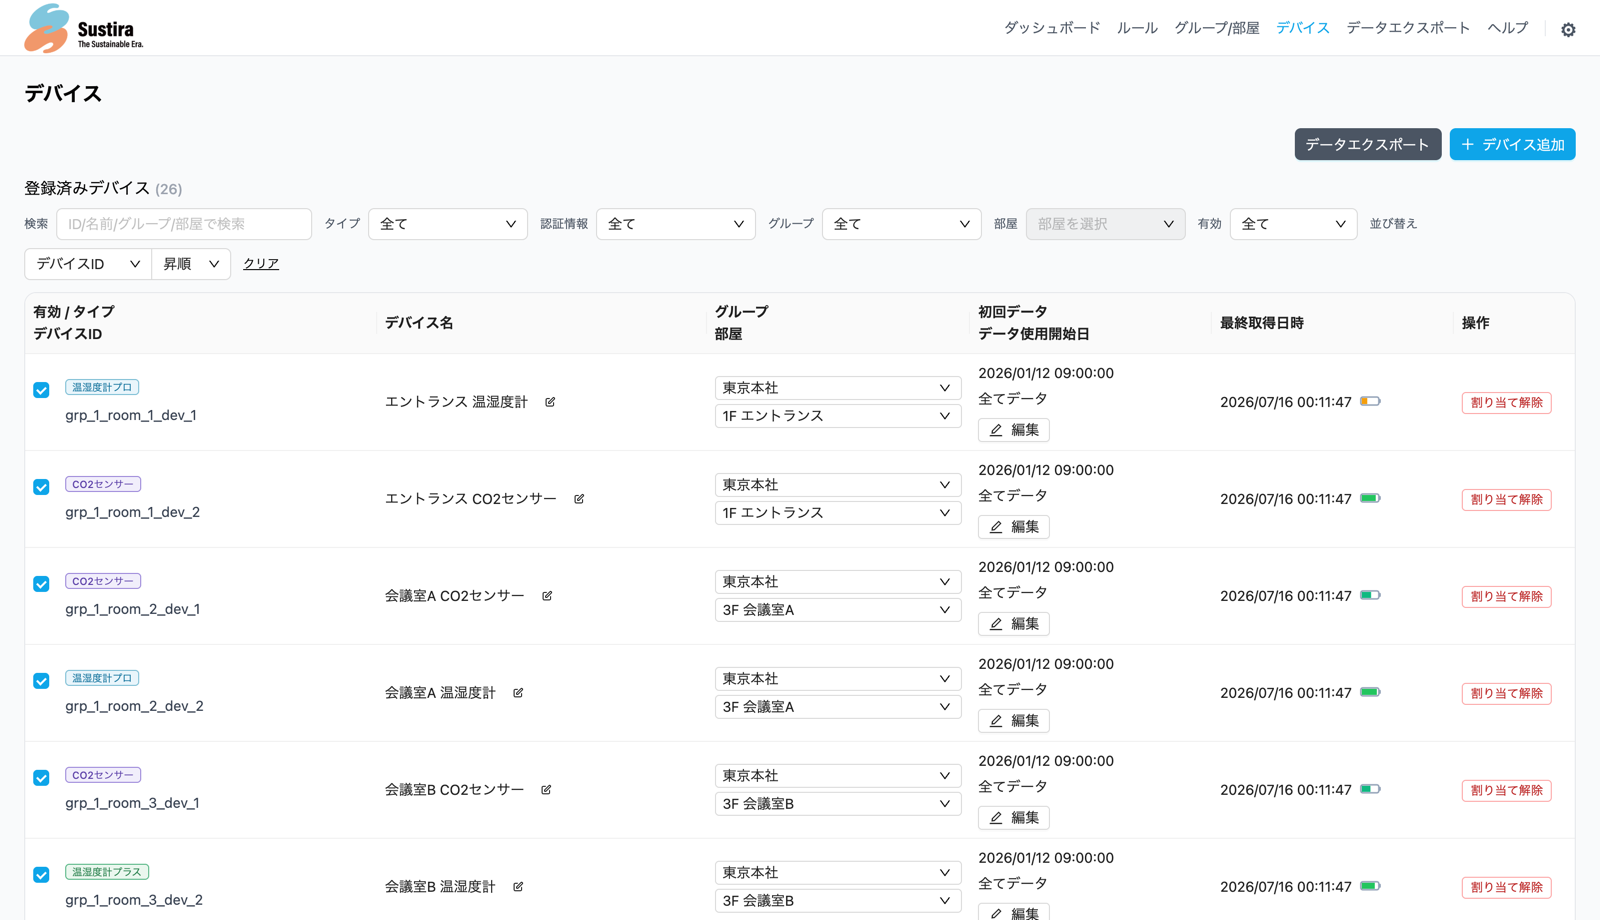
Open the "Devices" screen. The "Unregistered devices" section lists the devices on your SwitchBot account. These are retrieved automatically through the SwitchBot API.
Sustira retrieves device information and sensor data from the SwitchBot API every 5 minutes. When you add a new device in the SwitchBot app, it may take a few minutes before it appears in Sustira.
Step 2: Assign to a Group / Room
Assign unregistered devices to a Group and a Room. Once assigned, the device status becomes "ACTIVE" and data collection and monitoring begin.
- Find the target device in the unregistered device list
- Select the destination group from the "Group" dropdown
- Select the destination room from the "Room" dropdown
- Once assigned, the device moves to the "Registered devices" section
You need to create a Group and a Room before you can assign devices. You can create them from "Settings" > "Groups". Learn more about Groups / Rooms
Step 3: Manage devices
The following operations are available for registered devices.
| Operation | Description |
|---|---|
| Enable / disable monitoring | Turn data collection on or off for each device |
| Rename a device | Change the display name in Sustira (the name in SwitchBot is unchanged) |
| Change Group / Room | Move a device to a different Group or Room |
| Unassign | Remove a device from its Group/Room and return it to the unregistered list |
| Set the data start date | Specify the start date of the data used on the dashboard and in exports |
4. Device Limits and How Devices Are Counted
Every Sustira pricing plan has a device limit. This section explains in detail how devices are counted.
How devices are counted
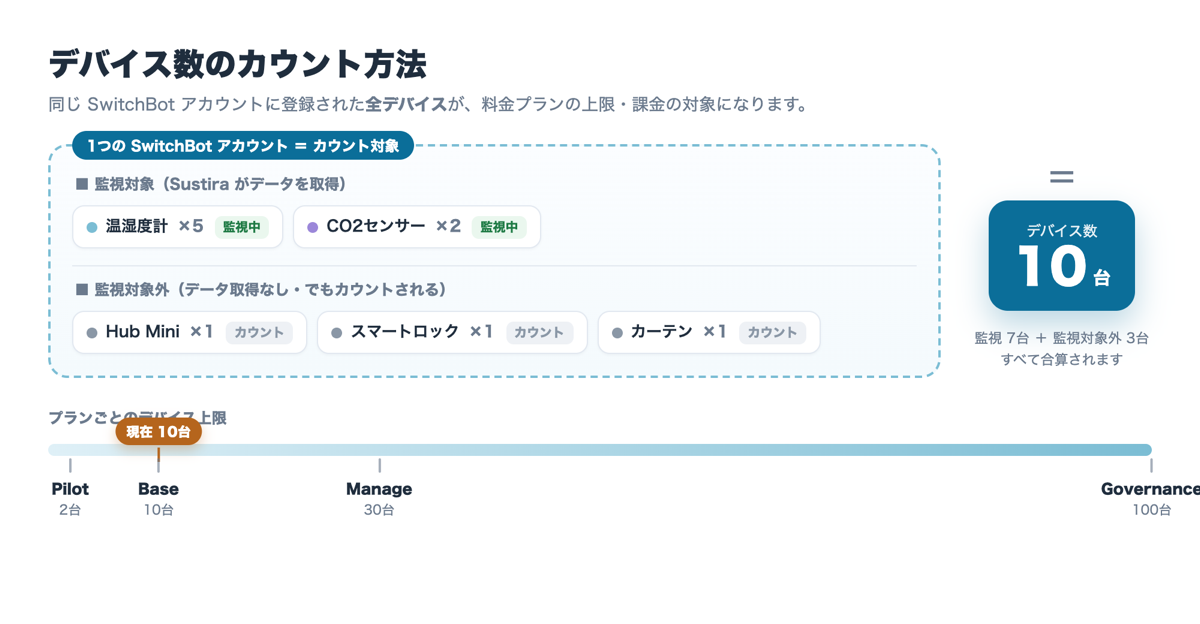
Your device count is the number of all devices registered on your SwitchBot account. It includes not only the devices Sustira monitors for environmental data, but every device registered on the same SwitchBot account.
Devices monitored by Sustira
Sustira periodically collects and records sensor data from the following SwitchBot devices. (As of 20 August 2026)
| Category | Device | Data collected |
|---|---|---|
| Thermo-hygrometer | SwitchBot Meter Meter | Temperature, humidity, battery |
| SwitchBot Meter Plus MeterPlus | Temperature, humidity, battery | |
| SwitchBot Meter Pro MeterPro | Temperature, humidity, battery | |
| Outdoor thermo-hygrometer | SwitchBot Indoor/Outdoor Thermo-Hygrometer OutdoorMeter | Temperature, humidity, battery |
| CO2 sensor | SwitchBot Meter Pro CO2 Monitor MeterProCO2Monitor | Temperature, humidity, CO2 concentration (ppm), battery |
| Power measurement | SwitchBot Plug Mini PlugMiniJP | Power consumption (W), daily energy consumption (kWh) |
| Water detection | SwitchBot Water Leak Detector WaterDetector | Leak detection status, battery |
| Hubs (with built-in sensors) | SwitchBot Hub 2 Hub2 | Temperature, humidity |
| SwitchBot Hub 3 Hub3 | Temperature, humidity |
Devices that count but are not monitored
The following devices count towards your device total as long as they are registered on your SwitchBot account, but Sustira does not collect or record sensor data from them. (As of 20 August 2026)
| Category | Typical devices |
|---|---|
| Hubs (without sensors) | Hub Mini, Hub Plus (Hub 2 / Hub 3 are monitored) |
| Controllers | Bot, Curtain / Curtain 3, Blind Tilt, Roller Shade |
| Sensors | Motion Sensor, Contact Sensor |
| Lighting | Color Bulb, Strip Light, Ceiling Light |
| Air conditioning / humidification | Humidifier, Circulator, Air Purifier, Smart Radiator Thermostat |
| Locks and security | Lock / Lock Pro, Keypad, Video Doorbell |
| Robot vacuums | Robot Vacuum Cleaner (S1 / S10 / K10+, etc.) |
| Others | Plug (standard), Relay Switch, Garage Door Opener |
The SwitchBot API limits the number of API calls per account (credential) per day (10,000 calls/day). Because Sustira retrieves information for every device registered on the account, unmonitored devices also contribute to that API load. For this reason, the plan device limit applies to all devices on the account.
A worked example
Example: a SwitchBot account with the following devices
- Meter x 5 → temperature and humidity monitored in Sustira
- Meter Pro CO2 Monitor x 2 → temperature, humidity, and CO2 monitored in Sustira
- Hub Mini x 1 → not monitored, but counted
- Lock x 1 → not monitored, but counted
- Curtain x 1 → not monitored, but counted
→ Device count = 10 (7 monitored + 3 unmonitored = all devices on the account)
Even "unregistered devices" that you have not assigned to a Group or Room in Sustira count towards your device total as long as they are registered on SwitchBot. To reduce your device count, you need to delete devices from the SwitchBot app.
If unmonitored devices (locks, curtains, and so on) take up much of your plan's device limit, we recommend creating a dedicated SwitchBot account for environmental monitoring and registering only the devices you need to monitor. Registering the credential of that separate account in Sustira keeps the counted devices to a minimum.
Device limits per plan
| Plan | Device limit | Credentials | Groups | Rooms |
|---|---|---|---|---|
| Pilot (evaluation period) | Up to 2 | 1 | 1 | 2 |
| Base | Up to 15 | 1 | 2 | 10 |
| Manage | Up to 40 | 1 | 10 | 50 |
| Governance | Up to 120 | Unlimited | Unlimited | Unlimited |
| Enterprise | 121 or more (individual quote) | Unlimited | Unlimited | Unlimited |
If you exceed the device limit
Once your device count reaches your plan limit, you can no longer assign new devices to a Group or Room.
What you can do:
- Upgrade your plan: move to a higher plan to raise the device limit
- Delete devices you no longer use: remove them from the SwitchBot app (see how to delete devices)
- Unassign devices: unassign devices you do not need to monitor
Tell us about your locations, rooms, and device setup, and we will recommend the plan that fits your company best. If you are close to a device limit or expect your device count to grow, please contact us.
5. Groups / Rooms (organisational structure)
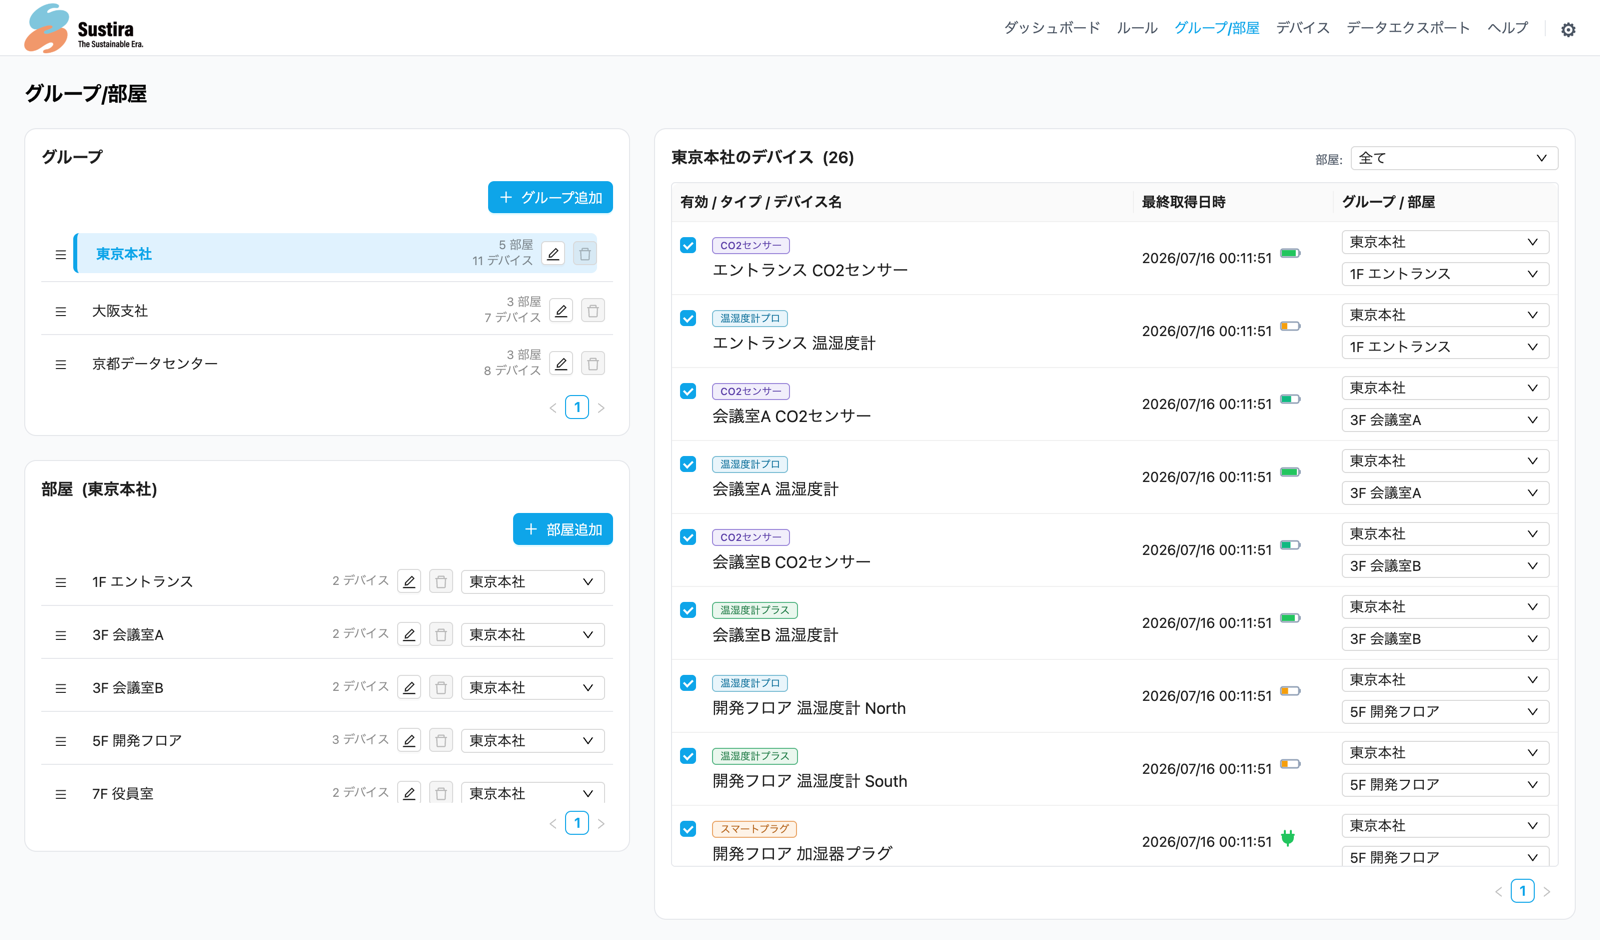
Groups and Rooms let you organise devices along your organisational structure, so that you can aggregate and report data by location, floor, or room.
How Groups and Rooms relate
| Concept | Description | Examples |
|---|---|---|
| Group | A larger organisational unit such as a location or building | "Tokyo Head Office", "Osaka Branch", "Factory A" |
| Room | A floor or room inside a Group | "3F Meeting Room", "1F Entrance", "Production Line 1" |
The number of Groups and Rooms depends on your plan. See the limits for each plan.
6. Dashboard
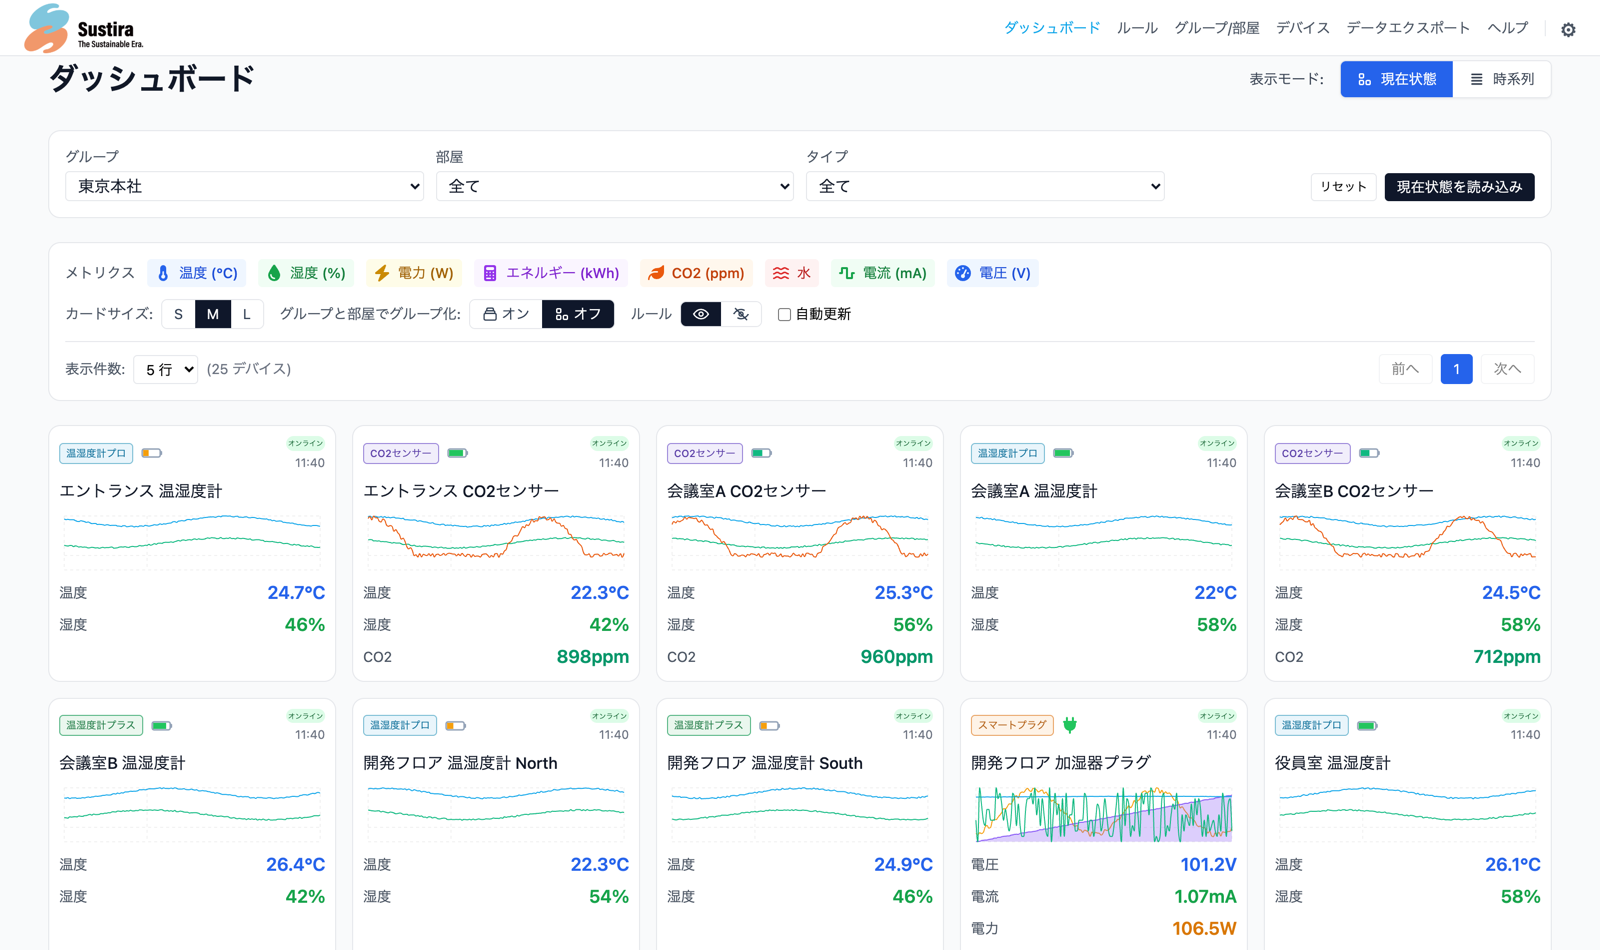
The dashboard is the central screen for checking environmental data in real time.
Main features
- Real-time data: see the current values of each device (temperature, humidity, CO2, and so on) at a glance
- Time-series charts: visualise past data as time-series charts, with period switching and zoom
- Period comparison: overlay data from different periods to confirm improvement trends
- Filtering: narrow the view by Group, Room, or device type
- Device status: check online/offline state and remaining battery
7. Rule settings (alert notifications)
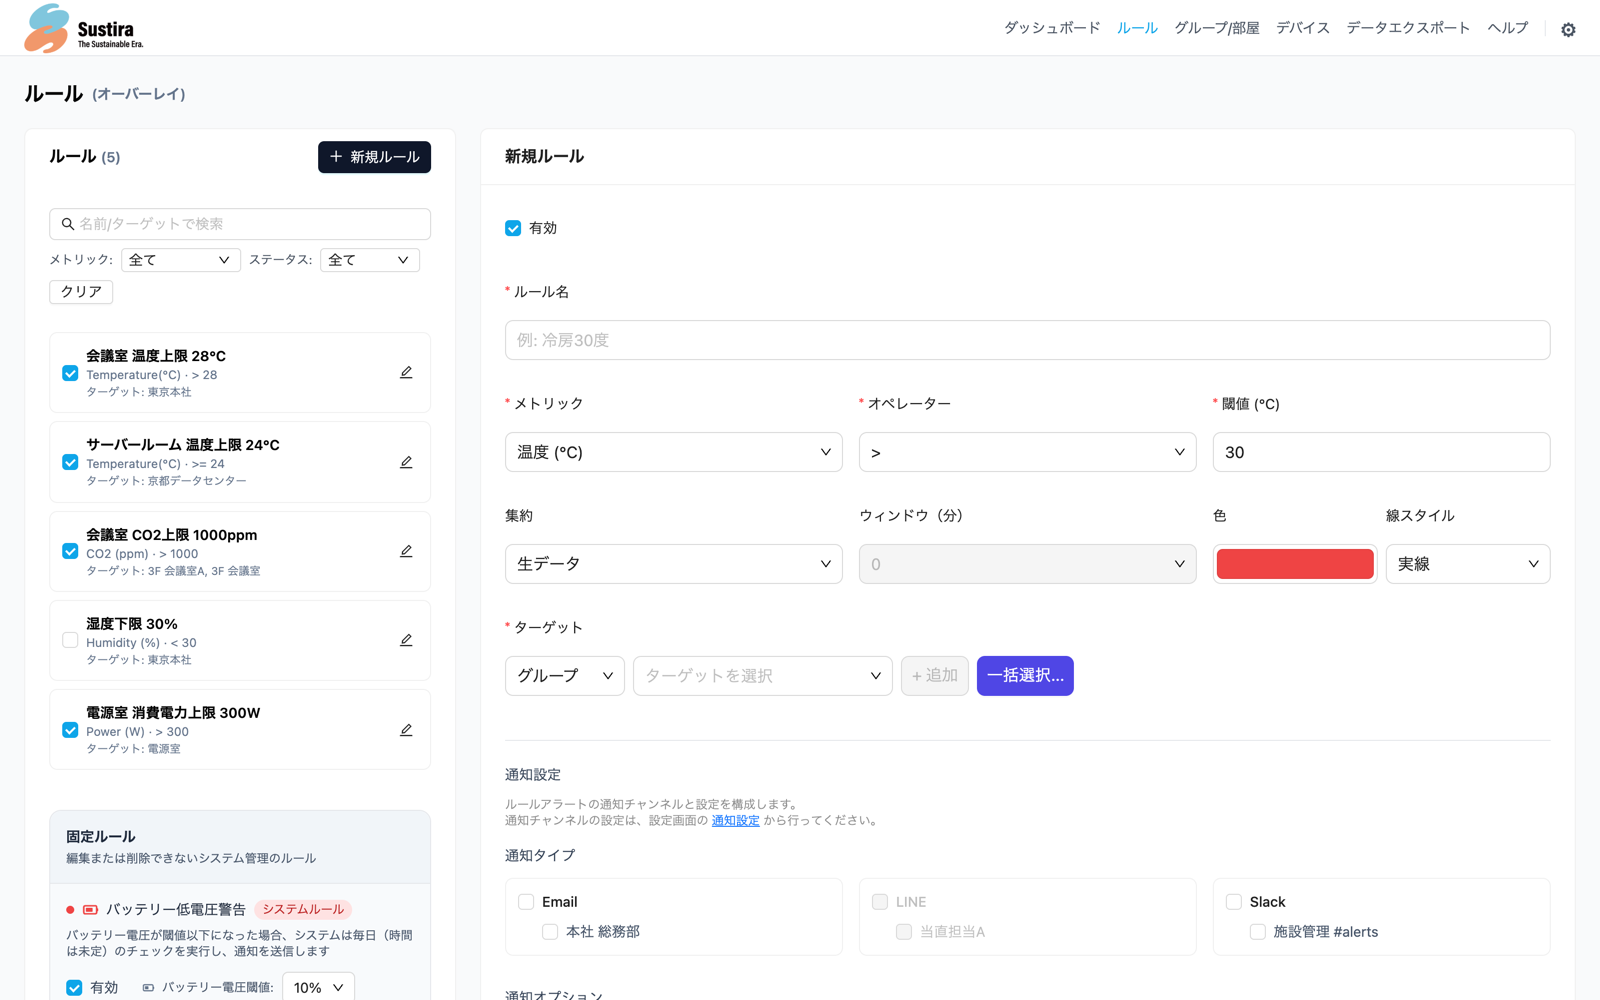
You can receive notifications by email, Slack, or LINE when environmental data crosses a threshold you have set.
Rules you can configure
- Temperature rises above or falls below a specified value
- Humidity rises above or falls below a specified value
- CO2 concentration rises above a specified value
- Thresholds on other measurements collected by your devices
Rule settings and alert notifications are available on paid plans (Base / Manage / Governance). During Pilot (the evaluation period), only dashboard data review and device management are available.
8. Notification settings (Email / Slack / LINE)
"Notification settings" is where you register the recipients of your alerts. When a condition defined in rule settings (a temperature, humidity, or CO2 threshold) is crossed, a notification is sent to the recipients registered here. Register them from the "Settings" > "Notifications" tab of the admin screen.
Notifications (Email / Slack / LINE) are available on paid plans (Base / Manage / Governance). They cannot be configured during Pilot (the evaluation period). See plan details
Basic operations
You can register three types of recipients: email, Slack, and LINE. The flow is the same for all three.
- Add: use the "+" button of each notification type to add a recipient (up to 5 per type)
- Label: always enter a name to distinguish each recipient (for example, "Head Office" or "Dev Team")
- Enable / disable: use the switch to turn a notification on or off (on by default)
- Save: after entering the details, click the save button for that type (for example, "Save all email notification settings")
- Delete: recipients you no longer need can be deleted (a confirmation message appears first)
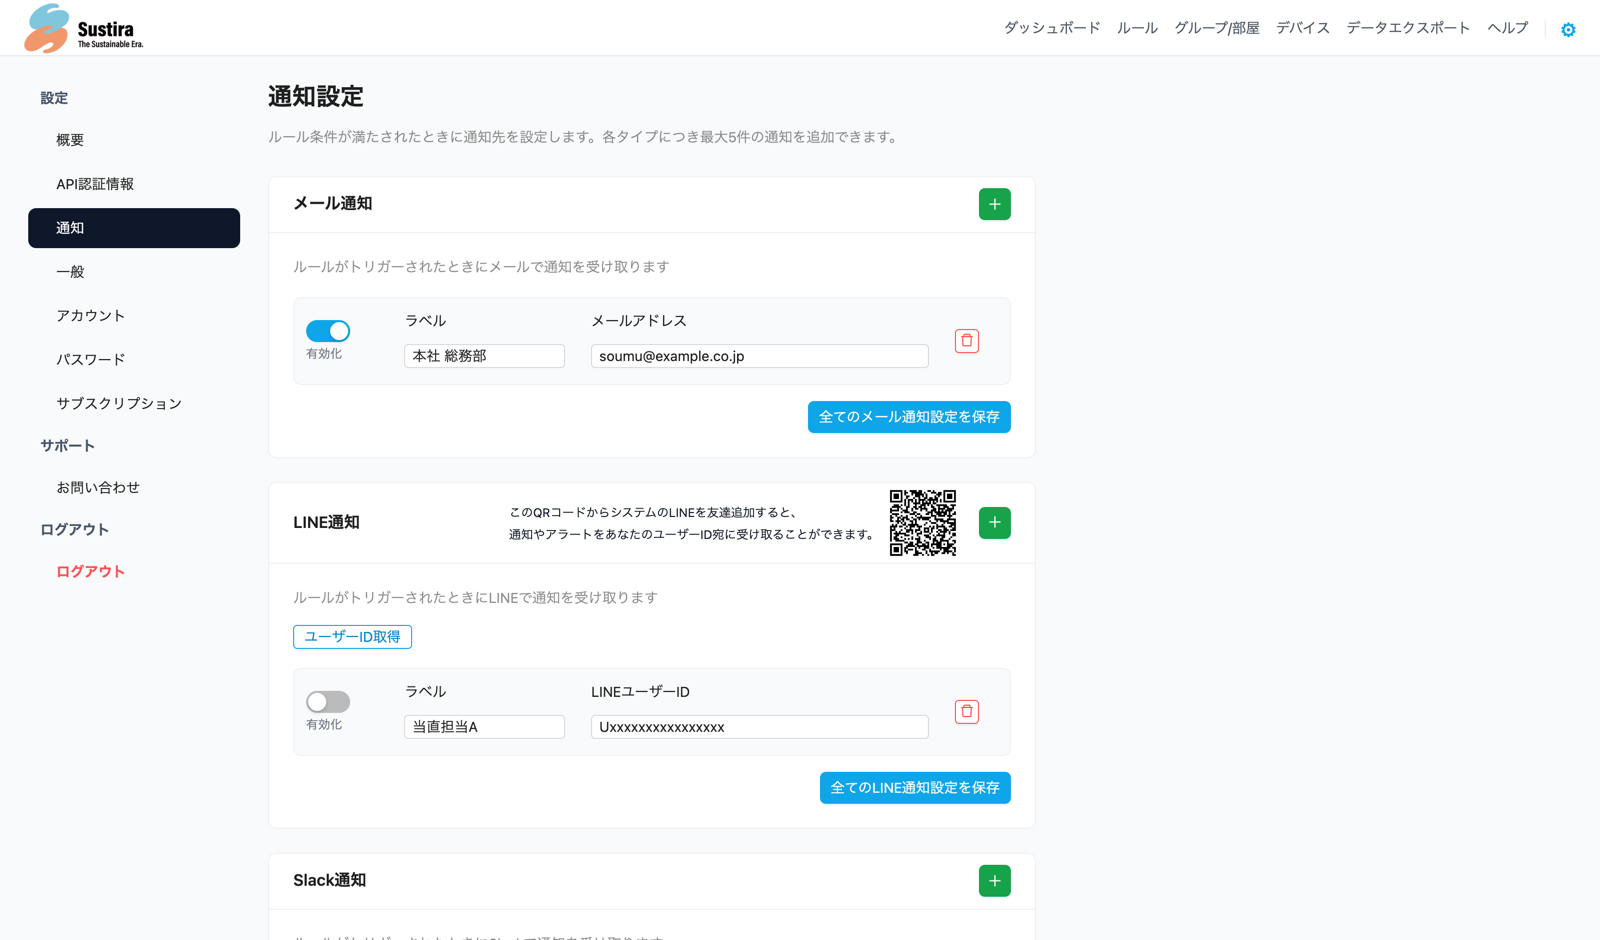
Registering email notifications
Alerts are sent to the email addresses you specify. You can register several recipients, such as a shared departmental address and individual addresses.
- Open "Settings" > "Notifications" and click the "+" button under "Email notifications"
- Enter a label to identify the recipient (for example,
Head Office / General Affairs) - Enter the email address (for example,
your-email@example.com) - Click "Save all email notification settings"
The address must be in name@domain format (for example, alert@example.com), otherwise it cannot be saved. An incorrect address means alerts will not arrive, so please enter it carefully.
Registering Slack notifications
Alerts are posted to a Slack channel through a webhook, which is convenient when you want to share notifications with your team. You need a webhook URL obtained in Slack beforehand.
- Obtain a webhook URL in Slack (see How to obtain a Slack webhook URL)
- Click the "+" button under "Slack notifications" in the "Settings" > "Notifications" tab
- Enter a label (for example,
Dev Team #alerts) - Paste the webhook URL into the Slack URL field
- Click "Save all Slack notification settings"
A Slack webhook URL must start with https://hooks.slack.com/services/. Any other format cannot be saved.
Registering LINE notifications
You can receive alerts on LINE. To register, add the official Sustira LINE account as a friend and obtain your LINE user ID.
Add the official Sustira LINE account
Scan the QR code shown under "LINE notifications" in the "Settings" > "Notifications" tab with the LINE app on your smartphone, and add the official Sustira account as a friend.
Click "Get user ID"
Add a recipient with the "+" button on the "LINE notifications" card, then click the "Get user ID" button that appears. The LINE login screen opens.
Log in and copy your user ID
Log in with your LINE account and your LINE user ID is displayed. Copy it with the "Copy" button.
Enter the label and user ID, then save
Return to the settings screen, enter a label (for example, Facility Manager) and paste the copied LINE user ID (for example, Ueaaec74e0ea231d…), then click "Save all LINE notification settings".
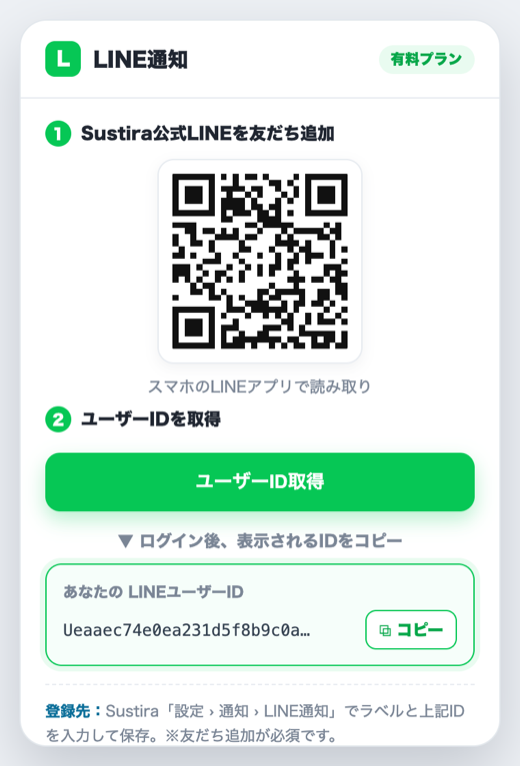
If you have not added the official Sustira LINE account as a friend, alerts will not arrive even after registering a user ID. Note that a LINE user ID consists only of letters, digits, hyphens (-), and underscores (_).
How to obtain a Slack webhook URL
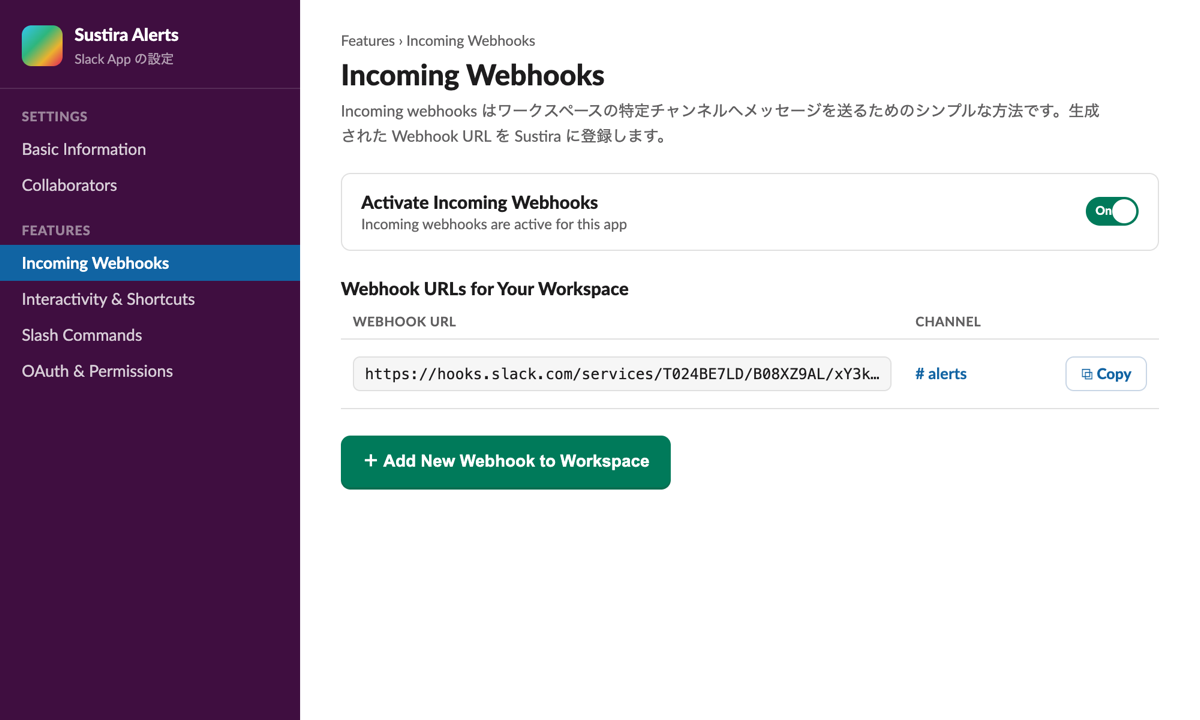
To use Slack notifications, create an "Incoming Webhook" in Slack and obtain its URL. The steps below follow Slack's official procedure. You need permission to add apps to the workspace.
- Open the Slack app management page (api.slack.com/apps) and click "Create New App"
- Choose "From scratch", enter an app name (for example,
Sustira Alerts), select the workspace to post to, and click "Create App" - Open "Incoming Webhooks" in the left menu and turn on "Activate Incoming Webhooks"
- Click "Add New Webhook to Workspace" at the bottom of the page
- Select the channel to post notifications to and click "Allow"
- Copy the generated webhook URL (
https://hooks.slack.com/services/T…/B…/…) with the "Copy" button - Paste the copied URL into the "Slack URL" field when registering a Slack notification in Sustira and save
A webhook URL is a secret key that allows posting messages to that channel. Do not share it with third parties or paste it anywhere public (source code, social media, and so on). To add a webhook to a private channel, you must be a member of that channel.
* Steps and screens may change as Slack updates its product. For the latest details, please refer to the official Slack documentation.
9. Data export
You can export accumulated environmental data as CSV, for analysis in external tools or for preparing reports.
Export steps
- Open the "Data export" screen
- Select the target Group, Room, and devices
- Specify the period to export
- Click the "Export" button to download the CSV file
CSV export is available on paid plans (Base / Manage / Governance).
10. Pricing plans and billing
Sustira pricing is not a sensor usage fee. It is a data platform fee for fulfilling accountability, with plans matched to the scope of that accountability.
Pilot (evaluation period)
Pilot
Free (21 days)An evaluation period for understanding how Sustira is structured and operated, so that you can make an adoption decision.
- Duration: 21 days
- Device limit: 2
- Credentials: 1
- Groups: 1 / Rooms: 2
- Available features: dashboard, time-series display, device management
- Limitations: rule settings, data export, and notifications are unavailable
- You are not charged automatically
- Continuing requires an explicit migration to a paid plan
- If you do not migrate, data becomes unavailable after 21 days (with a 7-day API grace period)
- Devices and data configured during Pilot can be carried over to a paid plan
Paid plans
| Plan | Monthly (tax incl.) | Target | Devices | Credentials | Groups | Rooms |
|---|---|---|---|---|---|---|
| Base | ¥19,800 | Department / small location | 15 | 1 | 2 | 10 |
| Manage | ¥49,800 | Single location / multiple departments | 40 | 1 | 10 | 50 |
| Governance | ¥99,800 | Company-wide / executive reporting | 120 | Unlimited | Unlimited | Unlimited |
| Enterprise | ¥150,000〜 | Large-scale / group companies | 121 or more | Unlimited | Unlimited | Unlimited |
* All paid plans include the dashboard, time-series display, period comparison, data export, rule settings, and notifications (Email / Slack / LINE).
* The Enterprise plan is quoted individually and is supported in Japanese. Please contact us.
Feature comparison by plan
| Feature | Pilot | Base / Manage / Governance |
|---|---|---|
| Dashboard | Available | Available |
| Time-series charts | Available | Available |
| Device management | Available | Available |
| Period comparison & aggregation | Available | Available |
| Rule settings (alerts) | Not available | Available |
| Data export (CSV) | Not available | Available |
| Notifications (Email / Slack / LINE) | Not available | Available |
| Groups / Rooms settings | Available (limited) | Available |
| Invoice payment | - | Governance and above (Japan-based corporations only) |
11. Changing your plan
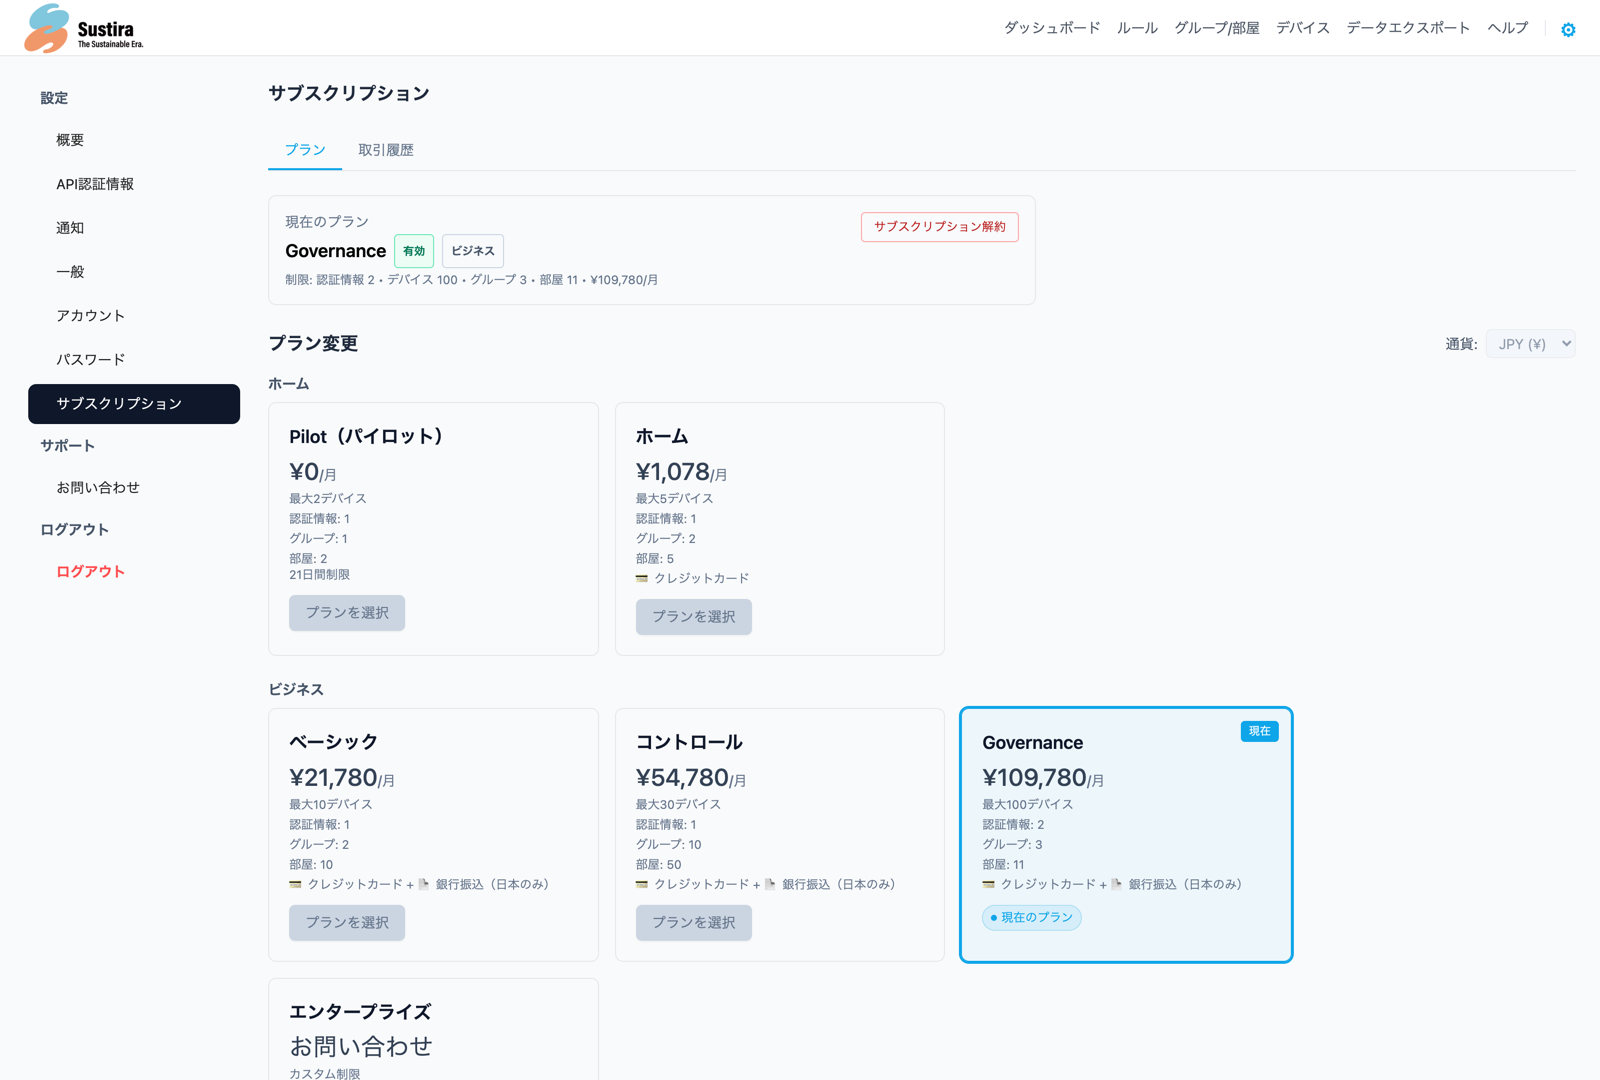
You can upgrade or downgrade at any time from "Settings" > "Subscription" in the admin screen.
Upgrading
Moving to a higher plan takes effect immediately.
- The limits and features of the new plan become available right away
- The difference is charged pro rata for the remainder of the billing period
- The new plan's price applies from the next billing cycle
Downgrading
To move to a lower plan, your current usage must already fit within the limits of the new plan.
If your current resource usage (devices, groups, rooms, credentials) exceeds the limits of the new plan, the downgrade cannot proceed. Reduce those resources first, then change your plan.
Example: to downgrade from Manage (40 devices) to Base (15 devices), you need to bring your device count down to 15 or fewer.
Migrating from Pilot
- Open "Settings" > "Subscription" in the admin screen
- Select the plan you want (Base / Manage / Governance)
- Register a payment method (credit card or invoice)
- Confirm the plan change to complete it
Devices and data configured during Pilot carry over to the paid plan as they are.
Cancelling
You can cancel your subscription from "Settings" > "Subscription".
- After cancelling, you can use the service until the end of the current billing period
- At the end of that period, your account moves automatically to the Pilot plan (free, with limited features)
- Your account and data are retained after cancellation, but dashboard access and data export become unavailable
- To subscribe again, simply select a plan
12. Payment methods
Credit card
Available on all plans. The following card brands are supported.
- Visa
- Mastercard
- JCB
- American Express
- Diners Club
- Discover
Payments are processed securely through Stripe, an international payment platform. Card details are never stored on Sustira's servers.
Invoice payment (bank transfer)
Available on the Governance plan and above.
- Only for corporations with a bank account in Japan
- Payment is due by the end of the following month
- Invoices can be downloaded as PDF from the admin screen
- Compliant with the Japanese qualified invoice system (registered invoice issuer number)
Currency
Payment is supported in Japanese yen (JPY) only. All amounts shown on the pricing page are in Japanese yen and include consumption tax.
Sustira is provided to customers with a place of business in Japan. Japanese subsidiaries and branches of foreign corporations are eligible, but the contract is with the Japan-based entity and payment is in Japanese yen only.
13. Invoices and transaction history
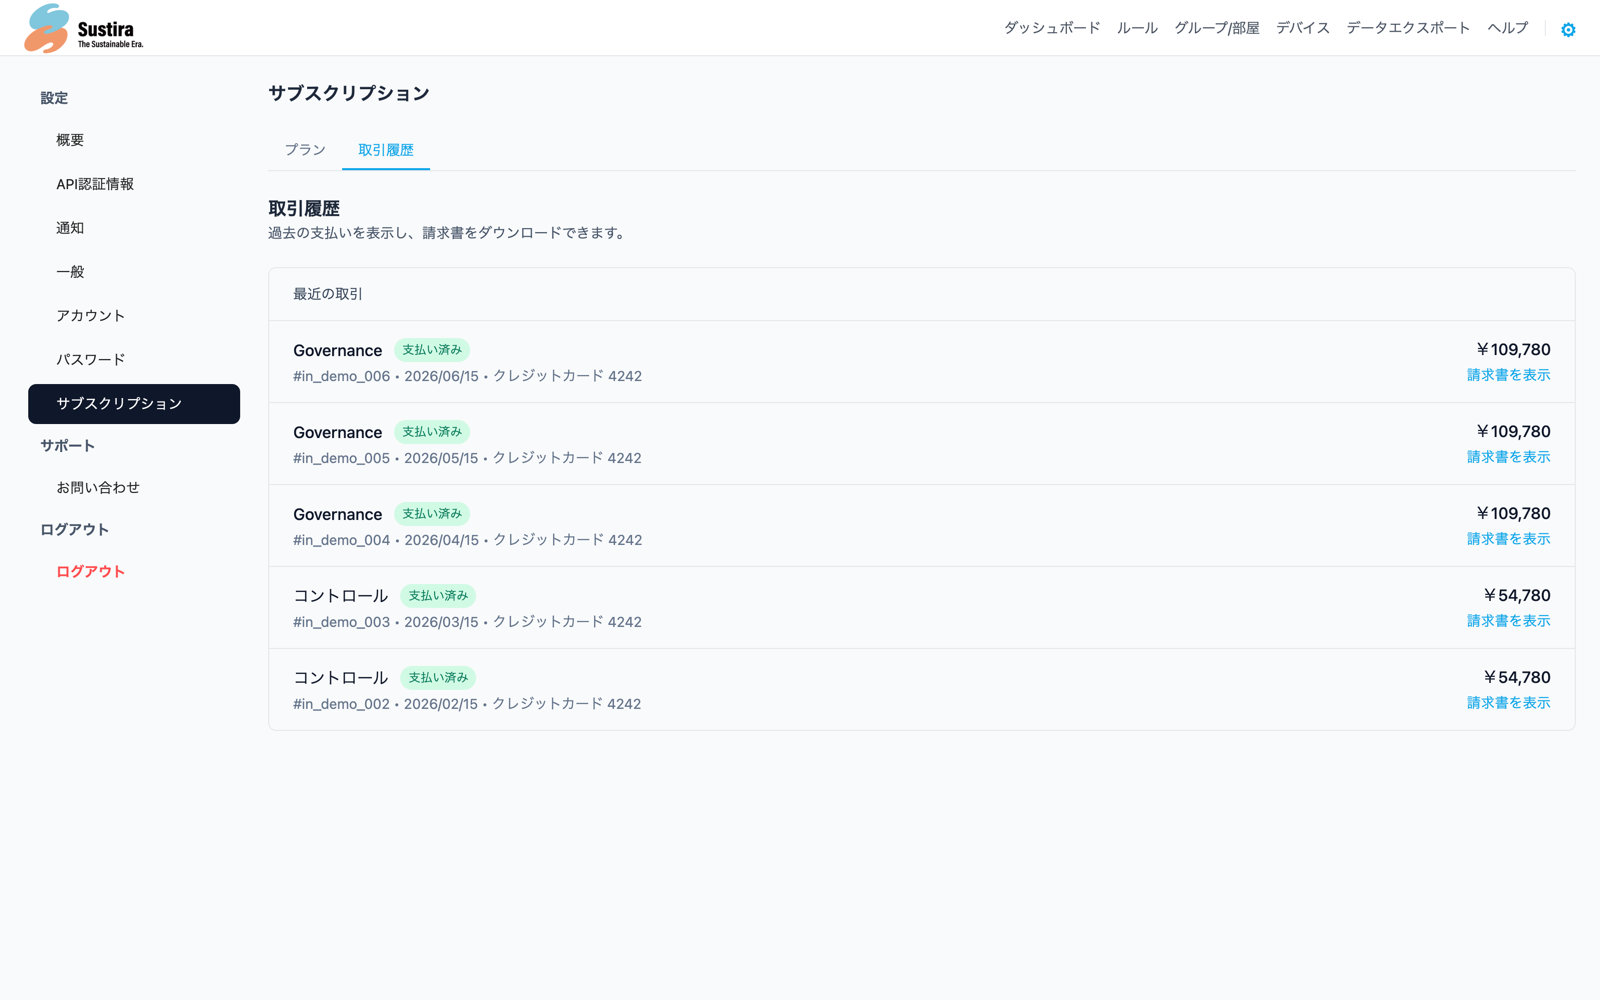
Past invoices and transaction history are available from "Settings" > "Subscription" > "Transaction history".
What you can see
- Invoice list: date, amount, and status (paid, pending, failed, and so on)
- Invoice details: invoice number, line items, unit price, tax, and payment method
- PDF download: each invoice can be downloaded as a PDF
- Printing: invoices can be printed
Invoice statuses
| Status | Description |
|---|---|
| Paid | The invoice was settled successfully |
| Pending | The invoice has been issued but not yet settled |
| Failed | Payment failed. Please check your payment method |
| Refunded | The refund has been completed |
| Cancelled | The invoice was cancelled |
14. Troubleshooting
Removing devices in SwitchBot
Devices registered on SwitchBot cannot be deleted from within Sustira. Please remove them using the official SwitchBot app.
Before you remove a device
Removing a device in SwitchBot does not delete the measurements Sustira has already recorded for it. They stay in your charts and data exports.
To take a removed device off your dashboard, unassign it on the Devices screen.
Removing a Hub may stop other devices connected to it from working. Please check what depends on it before you continue.
Steps (SwitchBot app)
- Open the SwitchBot app
- Select the device you want to remove
- Open the device settings screen
- Choose "Delete device"
* For detailed instructions, please refer to official guidance from SwitchBot.
When the device allowance updates
Devices you remove stop counting from the next check onwards, which takes a few minutes.
Unassigning a device in Sustira is not enough: while it remains on your SwitchBot account, it keeps counting towards your plan's device limit. Devices count while they are registered on SwitchBot, even before you start monitoring them in Sustira. To reduce your device count, delete the device from the SwitchBot app (see how devices are counted).
If a device is not sending data
- Check your credentials: confirm that the API token and secret key are correct
- Check the device power: confirm that the battery is not empty and the device is plugged in
- Check the SwitchBot Hub connection: confirm that the Hub Mini is connected to Wi-Fi
- Check that monitoring is enabled: confirm that the monitoring toggle for the device is on
If a payment fails
When a credit card payment fails, the subscription status changes to "past due".
- Check the card's expiry date and credit limit
- Update your payment method from "Settings" > "Subscription"
- If the problem persists, use a different card or contact us
If data is unavailable after Pilot ends
When Pilot (the 21-day evaluation period) ends, dashboard access and device management become unavailable. The API connection has a 7-day grace period, after which data collection also stops.
What to do: migrate to a paid plan (Base / Manage / Governance) from "Settings" > "Subscription". Data collected during Pilot is carried over.
Still need help?
If you have any questions, please feel free to contact us.
Not sure which plan is right? We will recommend the plan that fits your company best.